The removal of ground and storm water from the foundation will significantly increase the service life of both the capital building and the country house. A simple drainage system in the device will protect underground concrete structures from gradual erosion, and basements from flooding. But it is extremely important to prevent the destruction of the foundation of the structure, right?
A well-designed drainage scheme around the house will help to build an effective operating system for collecting and discharging natural water. We suggest you familiarize yourself with carefully selected and verified information, based on regulatory documents and the real experience of builders of low-rise buildings.
We will tell in detail about the types of drainage systems, the features of their device, the specifics of operation. We will argue in favor of choosing a certain type of drainage. The useful information presented to your attention is supplemented by photos, diagrams and video instructions.
Types of drainage facilities for drainage sites
When designing a drainage system, they primarily determine the goals that are planned to be achieved. They can consist in draining the entire site, in protecting the foundation and basement of the house from excess moisture.
Of the existing drainage systems, two main types can be distinguished - open and deep (closed). The first can be used for agricultural needs, for wastewater from cultivated areas. Indoor drainage is used to drain water in cottages and cottage areas, to protect buildings from the negative effects of high water pollution.

Organization of a drainage system is necessary with a high groundwater table, which is especially evident in the flood period. Drainage protect concrete foundation from groundwater aggression and reduce hydraulic load
Combined drainage systems are also used. They are often supplemented by storm sewer branches designed for utilization of atmospheric water. Subject to their competent design, they can significantly save on the construction of each system individually.
Image Gallery
Photo from
Flooding during snowmelt
Erosion and soil washing under the foundation
Water at the level of communications
Countryside slope
# 1: open drainage device
Open drainage is the easiest and most economical way to drain water, which can be used under the following conditions:
- clay soils underlying the soil layer, poorly transmitting water, due to which the fertile layer, located 20-30 cm from the surface of the earth, is waterlogged;
- the site is located in a lowland, into which rainwater naturally flows during a period of heavy rainfall;
- there is no natural bias in the relief of the site, providing the movement of excess water in the direction of the street.
Outdoor drainage is arranged in areas with high water supply, the mark of which is most often due to the location of the land allotment in the lowland or clay composition of soils that do not pass or pass water very weakly into the underlying layers.

The drainage system, designed to drain excess groundwater, works well together with stormwater, the job of which is to collect and discharge precipitation (+)
Planning a drainage scheme is best done at the design stage of the house. This will allow you to connect the work of the drainage system and place the storm water inlet under the drains until the gutter device.
Open drainage is considered the simplest and does not require a drawing up of a scheme. It is a trench 0.5 m wide and 0.6-0.7 m deep. The sides of the trench are positioned at an angle of 30 °. They encircle the territory around the perimeter and direct the wastewater into a ditch or foundation pit, into a storm sewer.
Territories with a slope towards the street are easier to drain. To do this, in front of the house, a gutter is dug across the slope, which will hold water from the garden. Then they dig a ditch, it will direct the drains towards the street, into the ditch.
If the site has a slope in the direction opposite to the road, then a transverse drainage ditch is dug in front of the facade of the fence and another longitudinal is made to the end of the site.

The disadvantage of such drainage is its low aesthetics and the need for regular cleaning of the gutters from the sludge and dirt that periodically accumulates in them. This type of drainage is not recommended to be arranged under the road surface, as it leads to soil subsidence and deformation of the canvas
The length of the lines for water flow, the number of wells and sand collectors depends on the area of the site, its topography, and the intensity of precipitation in a particular area.

Drainage ditches can be strengthened from erosion using reinforced concrete slabs, stone paving, sodding with crushed bottom
If the site is considered more or less even, and its level of bogging is not too high, then you can do with the simplest drainage system.
Along the foundation of the fence, at the lowest point of the site, dig a ditch 0.5 m wide, 2-3 m long and 1 m deep. Such a drainage system, although it protects against high water pressure, and can cope perfectly with precipitation.

So that the edges of the ditch do not collapse, it is filled with rubble, broken glass and brick. After filling it, they dig the next one, it is also filled and tamped tightly. The excavated soil is used to backfill low places in the territory
Over time, this simplest drainage system may lose performance due to gradual siltation. To prevent this from happening, it can be protected by a geo-strip. It is laid on the ground, after filling the ditches with an overlap, the drainage layer is closed to it. From above, to hide the ditch, it is sprinkled with a layer of fertile soil.
# 2: Building an Effective Storm
Storm sewage is necessary for the accumulation and withdrawal of water falling in the format of precipitation from a section of water. It is equipped with point and linear drainage devices.
Image Gallery
Photo from
Storm sewage with point water intake
Drainage channels of spot stormwater
Linear water inlets
The structure of the trays with gratings
The first type of water collectors is installed under the risers of the organized drainage system. The second type of catchment is located under the roof slopes with an unorganized drain.
Water entering the catchment flows through an open or closed pipeline. It is diverted either to a common well-catchment well, or to a collector well, from which it moves to a centralized sewer network or a gutter.

The storm water inlet is a container for collecting water, equipped with bends for connecting pipes of a linear drainage system. Devices are made of durable plastic or cast iron (+)
Elements of a storm system with point water collectors are also drainage drains, drains, dampers. Some manufacturers provide for the possibility of connecting storm water inlets with roof gutters, as well as with underground drainage systems.
In addition, off-the-shelf production models include sand traps and waste bins that simplify system maintenance.

A device with a decorative grill installed should be located 3-5 mm lower than the level of the track, ground
This is a system of gutters made of plastic or concrete, which are installed on the site in those places in which the accumulation of water is most likely, but extremely undesirable.

For the drainage well, choose the most remote place from the house, well, cellar. If there is a natural or artificial pond nearby, then water can be diverted into it
When designing a scheme of stormwater with linear water inlets, the first thing they plan is to place a catchment or collector well. Next, determine the location of the rotary and revision wells. Their arrangement will depend on the placement of rain gutters, gutters and closed sewer branches.
To prevent water from entering the courtyard from the street, gutters are installed along the line of gates leading to the courtyard, garage doors, and also in the gate area. When choosing the elements of the system that will be installed on the roadway, take into account the future load on them.
To prevent moisture from entering the building, the slope of the coating in the garage is done towards the intake grille. So water, when washing a car or thawing snow on a vehicle, will drain into the gutter.

Drainage trays must be installed on the porch around the pool. They are also installed along the blind area, garden paths laid out from the facing material of the sites
To give the shower a neat appearance, special trays made of polymer concrete, plastic, which are closed with metal or plastic grates, are used. At the entrance to the house use a special tray for cleaning shoes.
The grate for the gutter installed near the pool is chosen plastic, white in order to avoid burns on a hot summer day.

In intensive use, drainage trays are mounted on a concrete base. The higher the load class on the carriageway, the greater the thickness of the concrete sole (+)
Gutters and water intake points are connected to the drainage tank by sewer pipes. At the junction of the gutters and pipes provide inspection wells. They are designed to facilitate access to the system and its cleaning from possible clogging.
Revision wells are made mainly of plastic. In order to obtain the necessary depth, their design provides for the possibility of building with the help of special extension elements.

Placement, slope and length of storm sewer pipes - all these characteristics are very individual and depend on many conditions on the site
A wide range of system elements allows the most rational design of the drainage scheme around the house, which will be optimal from a technical and financial point of view.

The main elements of linear drainage are gutters made of concrete, polymer concrete, plastic, point receivers, sand traps, gratings (+)
# 3: Construction of closed drainage options
Underground, closed drainage is used if the open system device takes up too much space on the land or it does not fit into the landscape picture of the territory. The conditions for its construction of a closed drainage system are similar to the prerequisites for organizing a network of open drainage ditches and ditches.

Closed drainage schemes are used to protect the foundation, basements from groundwater and increase their service life. They, by analogy with open ones, are used to drain the countryside from excess groundwater
It is mandatory to organize underground drainage on the site if:
- it is located in a lowland, in a swampy area;
- near the buildings is a natural reservoir;
Its device is recommended if the house has an exploited basement (garage, basement, cellar).
Underground drainage can be divided into two types:
- wall drainage;
- trench (reservoir) drainage.
Both types of underground drainage are carried out at the construction stage of the building. If it was decided to start the problem of water disposal after the construction of the house, then a trench ring system is used. There are restrictions for the use of trench drainage. It can be used if there is no basement in the house.
The fact is that, after laying the drains, backfilling of the pit with sand or soil creates a more friable environment between the bedrock and the foundation. As a result, the water enters the environment and then even the presence of a clay castle does not protect the building from moisture.
Therefore, if the house has a basement, for effective drainage, it is best to do wall drainage. It is used for drainage of groundwater directly from the foundation of the building, to protect basements, cellars, basement floors from flooding.

You can not plant trees and shrubs near the drain. The distance to the planted tree can be at least two meters and to the bush at least one meter
A wall-mounted drainage system limits the increase in water level, preventing its rise above the line of location of drainage pipes - drains. It is believed that a drainage pipe with a length of 1 m is capable of draining an area of about 10-20 m2.

The pipe when arranging wall drainage is laid around the perimeter of the building. The depth of the laying of drains cannot be lower than the base of the foundation slab or the sole of the foundation. If the foundation is deeply buried, then laying the pipe slightly above its base is allowed (+)
The distance from the drainage pipe to the foundation depends on the placement of the inspection wells. They are laid in each corner (or through one corner) of the building, as well as in places of turns and pipe connections.
Revision wells are also located in places with a large level difference of the site and with a large length of pipes - the distance between the wells should be no more than 40 meters.

In the inspection well, the pipe cannot be whole, it breaks. This is done so that when the pipeline becomes clogged, it remains possible to rinse it using a high pressure hose
The whole system closes to the last well. It should be located in the lowest place. Next, the water flows into a normal sewer or open water. If it is not possible to divert water from the house by gravity, then the pumping equipment is installed and it is pumped out forcibly.
To ensure gravity drainage of water, pipes are laid with a slight slope towards the collector. The slope should be two centimeters per meter of drainage pipe. The depth of the pipe should be greater than the depth of freezing of the soil.

The pipe is filled with drainage material - gravel, small gravel or sand. The minimum layer that will ensure the flow of water into the drain is 0.2 m
To save on geocomposite materials and prevent their mixing with the soil, use geotextiles. It freely passes water to drains and at the same time retains particles that lead to siltation. The pipe itself must also be wrapped in protective material before backfilling. Some models of drains are produced with ready-made filters from geotextiles.
It is possible to increase the efficiency of wall drainage with the help of a profiled polymer membrane, which can be two- or three-layer. One of its layers is a polyethylene film with formed protrusions, and the second membrane layer is geotextile fabric.
The three-layer membrane is equipped with an additional layer of smooth plastic film. The membrane helps to filter water from the soil and at the same time serves as a waterproofing layer for the foundation of the building.
Indoor trench drainage protects the building from flooding and moisture. It is a filter layer, which is poured into the trench at a distance of 1.5-3 m from the wall of the house.
It is better that the depth of the drainage is 0.5 m deeper than the base of the foundation - so the water will not exert pressure on it from below. Between the trench with drainage and the foundation of the house remains a layer of clay soil, which serves as the so-called clay castle.

To lay the drainage pipe, they dig a trench no deeper than 1 m with a slope towards the catchment. It is advisable to lay the bottom of the ditch with a layer of clay (+)
As with the installation of a wall drainage system, the drains are laid on a layer of gravel or small gravel. Both pipes and gravel are protected by geotextiles from clogging.
# 4: Step-by-step wall drainage construction
In order to get a visual representation of the drainage process around a country house, consider an example. The section shown in it required the installation of a groundwater discharge system, as loam and sandy loam occur under the soil and plant layer, which transmit water extremely poorly due to the low filtration capacity.
Image Gallery
Photo from
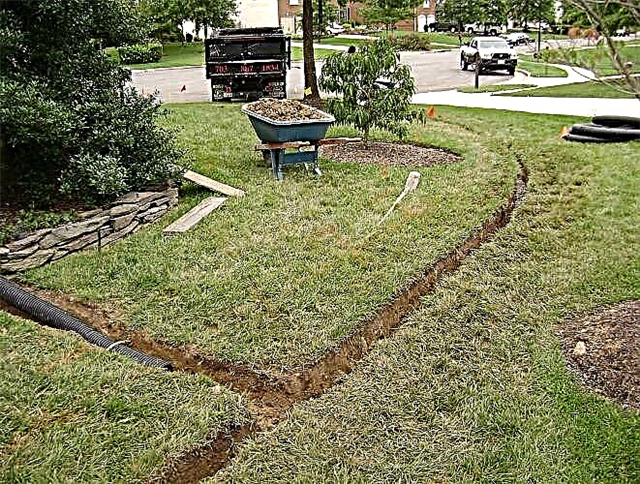
For a drainage device, we develop a trench around the house. Since the work was carried out by a mini-excavator, they retreated from the walls of 1.2 m, so as not to damage the building. If you save manually, you can do it better. The bottom of the mine is 20-30 cm below the foundation
The branches of the trench formed around the house should have a bias towards a common trench designed for the pipe for collecting the collected water to the collector well
We fill the bottom of the trench with sand. We ram it and form a slope of 2-3 cm per linear meter. The slope is directed towards the common trench, the bottom of which is also dumped and tampered. In case of crossing the trench with communications, we take into account that the drainage pipes must pass below them
We prepare drains, perforated polymer pipes, for laying in a trench. We wrap them with geotextiles, which will prevent clogging of the system and filter groundwater
We cover the tamped bottom of the trench with a second layer of geotextile, pour gravel on it and put drains
The channels of water drainage from storm sewers and the drainage system are laid in one trench. It is permissible to drain the water collected from them into one collector and use common inspection wells
Having wrapped the gravel backfill along with the drainage pipe with the second layer of geotectil, we fill the trench with quarry sand. We do not use soil dumped during the development of the trench, sand will better pass water to collect draenei
We bring the common trench to which the circular drainage is brought to the installation site of the collector well
Step 1: Design a trench for a drainage device
Step 2: Deriving the Circular Trench to the Common Trench
Step 3: sanding the bottom of the trench and tamping
Step 4: Prepare the drain pipe for installation
Step 5: Laying on the bottom of the trench geotextiles and drains
Step 6: Parallel Storm and Drainage
Step 7: Filling the trench with sand without inclusions
Step 8: Output the trench to the site of the collector well
The collector well in the example is intended for the partial discharge of collected water into the underlying soil strata and for the partial removal of excess from the site into a public gutter. Connected to it will be drains from a septic tank, stormwater and drainage. To drain excess water, a drain pipe located below all will be installed.
Image Gallery
Photo from
Step 9: Delivery of concrete rings to the site
Step 10: Installing the rings in the designed pit
Step 11: preparing the bottom of the well to fill the filter
Step 12: Laying Geotextiles Before Backfilling
Step 13: Backfill the bottom layer of the filter - sand
Step 14: Sewer Pipe Entry into the Manifold
Step 15: filling the foundation pit with sand
Step 16: Designing a trench to drain drains into the street
Having successfully dealt with the bulk of the work, we proceed to the final improvement:
Image Gallery
Photo from
Step 17: Laying the Sewer from the Manifold
Step 18: Filling the Trench with Sewer
Step 19: Installing the Manifold Well
Step 20: Leveling the area around the house
# 5: Organization of combined systems
On the site near the house, you can also organize a combined drainage system. For example, drains from drainage and stormwater can accumulate in one collector well. In this case, the collector for collecting wastewater must be constructed taking into account the load from both systems. In addition, storm sewers may include point and linear catchments.

With this scheme, stormwater and drainage are laid independently of each other (in parallel). Only a collector collecting drains from both systems can be common
It must be remembered that the mistakes made during the mixed type of water disposal can even lead to an increase in water treatment, flooding of basements, cellars. The main drawback is the discharge of water from the drainage system into the underground drainage system.
When these two systems are combined, water from the roof enters the drains and seeps into the ground. This is especially active during heavy and prolonged precipitation. As a result, water, instead of leaving the system, seeps into the soil and saturates it with moisture.
Video # 1. Scheme of surface drainage and its installation:
Video # 2. Do-it-yourself trench drainage system around the house:
Video # 3. Nuances of design and construction of a sewage system:
When designing a drainage system around a private building, it is very advisable to first obtain the advice of a hydraulic specialist. Failure to comply with the rules and conditions of water reduction can lead to subsidence of the soil, home, road.
This is especially important to consider when installing deep drainage. Therefore, it is better to draw up a drainage diagram around the house at the stage of drawing up the plan, then all the nuances of construction and sanitation will be taken into account in one project.
Those who wish to talk about their own experience in the drainage device are welcome to post comments. You can write them in the block below. Here you can ask questions and publish a photo on the topic of the article.