Tap water is practically unsuitable for drinking and requires preliminary preparation. Boiling and settling are simple methods, but not very effective.
Household filters cope with this task much better, but the installation of reverse osmosis gives the highest degree of purification. The method is expensive, but completely worth the investment.
Water purification by reverse osmosis is still the most advanced. The principle of its work is similar to the metabolism of a living organism. With it, it is possible to rid water of almost all impurities, viruses, bacteria, nitrates, etc.
It is easy to install reverse osmosis with your own hands, it is assembled as a designer, and the work does not require special tools - a minimal set of amateur is enough.
The principle of operation and the purpose of the system
Reverse osmosis is a process in which the flow of water is divided into two unequal parts with different densities. One part is pure water, and the second is water with a lot of pollution.
For this separation, a special membrane with very small holes is used. Their size is 0.0001 microns.
Water passing through the pre-treatment cartridges is freed from suspended particles, chlorine residues, and organic compounds.
Image Gallery
Photo from
The main component of the ultrafine purification and preparation of drinking water system is a membrane filter. In the configuration, the photo is represented by the lower horizontally stacked module
The membrane filter is a multilayer polymer web with a pore size of 0.0001 microns
Water passes through a membrane filter under pressure, "parting" with all kinds of impurities and organics, including bacteria and viruses
The membrane filter is installed in a plastic casing, on the one hand it is connected in a water hose, and on the other hand it is connected to a hose discharged into the sewer. Water passing through the membrane is supplied to the consumer, everything that has not passed is drained
The reverse osmosis system is based on a membrane filter
Membrane Filter Structure
The reverse osmosis filter traps harmful impurities
Membrane Filter Module Components
Once in the reverse osmosis membrane, water passes through its semipermeable layers and is further divided into two streams.
One of them, the concentrate, is discharged into the sewer, and the second, permeate, enters the storage tank, which compensates for the inability of the membrane to provide sufficient productivity for the user in the flow mode.
Through the pores of the membrane can only penetrate particles whose size corresponds to the size of a water molecule or less.
Large particles do not penetrate through the membrane barrier, but they are able to clog these small pores, so before exposing the water to the reverse osmosis procedure, it must be prepared.

Membrane pores are 200 times smaller for viruses and 4 thousand times smaller than bacteria. It passes only water and oxygen molecules through itself.
For mechanical removal of contaminants, two filters are used with openings of five and one micron, respectively. Between these two filters one more is installed - with carbon filler. It retains the molecules of various chemicals dissolved in water: iron, chlorine compounds, heavy metals, etc.
Molecules of some substances are smaller than water molecules. If there is no pre-treatment, they can penetrate the membrane and contaminate the water.
Products obtained by reverse osmosis are called permeate and concentrate. The latter is that part of the water in which the pollution is concentrated. This part is usually about 60-65% of the water, it is disposed of in the sewer.

Reverse osmosis is used to purify water at the molecular level.
Permeate is a very clean water, the degree of purification reaches 98%. Along with harmful contaminants, the membrane and filters also cut off many useful substances that give natural drinking water a unique aftertaste and properties. To eliminate this small drawback, permeate is passed through another filter.
To enrich the water with useful minerals, use a mineralizer. Bioceramic filter with tourmaline allows you to bring the structure of permeate to its natural state. There are also post-filters with the ability to expose water to ultraviolet radiation.
The simplest post-filter contains activated carbon and coconut shells. With its help, the permeate is subjected to additional purification and give it a pleasant natural taste. If desired, such modules can be discarded, but then the water obtained from the reverse osmosis system will not be so tasty and healthy.

This diagram details the connection and operation of the reverse osmosis system and all its main elements are indicated
The basic package includes the necessary elements that can ensure the effective operation of reverse osmosis.
If the water pollution exceeds the norm or the water supply system is not able to ensure the normal operation of the device, then it will be improved with the help of additional equipment.
Image Gallery
Photo from
Operating reverse osmosis system
The constituent elements of the installation of fine cleaning
Pressure boosting pump
DIY system installation
Interesting facts, pros and cons of membrane cleaning are presented in this article.
Components of a typical kit
Typically, reverse osmosis systems are supplied as a kit, which already has everything you need, even fasteners.
The list of equipment may vary by model and include the following items:
- reverse osmosis membrane;
- block with pre-treatment flasks in which three filters are installed: two mechanical and one carbon;
- postfilter;
- mineralizer;
- tap for drinking water;
- filter replacement key;
- a key for the membrane body;
- set of tees connectors;
- mounting plate for crane;
- set of flexible hoses, etc.
Before buying, you need to decide on issues such as membrane performance and the availability of additional modules.
For example, you can simultaneously install a post-filter, a mineralizer, and a bioceramic cartridge, or limit yourself to a post-filter.
Image Gallery
Photo from
A reverse osmosis unit is a multi-stage water treatment system that cleans it at the molecular level
The standard system kit includes three pre-filters, a membrane filter and a module for balancing the taste and smell of purified water
Modules with a filter element are arranged in a clear order. First, the water undergoes rough cleaning and gets rid of particles with a size of 5 microns. Then through a charcoal filter and a fine filter holding particles of 2 microns
At the end of the pretreatment, water enters a membrane filter that holds mineral and organic inclusions up to 0.0001 microns in size. Microbes and viruses are filtered out here.
Water passing through the membrane filter enters the charcoal purifier, which evens smell and taste, or into the storage tank, and then to the consumer
At the request of the owners, a mineralizer can be included in the system, enriching the composition of the water with useful mineral components
In regions with typically hard tap water, pre-treatment filters must have at least three
Where the water supply supplies soft water or the water canal carries out enhanced cleaning, the number of pre-treatment filters can be reduced
Superfine water purification system
Standard Filter Set
Mandatory location of modules
Reverse osmosis membrane
Charcoal Water Treatment Filter
Mineralizer - an optional component
Options for hard water areas
System for soft water areas
When choosing a reverse osmosis system, attention should be paid to the size of its elements. Most often, popular models have standard sizes. This allows you to choose suitable production options from different companies when replacing the membrane or filters.
But if the dimensions of the model are unique, you may have to install only special branded cartridges, and this is not always profitable and convenient.
Reverse Osmosis System Installation
The variety of reverse osmosis systems is very large. Therefore, further installation of the filter will be considered on the example of the most common - with a five-stage cleaning and storage tank.
Image Gallery
Photo from
Preparing for reverse osmosis
Connecting filter modules
Connection of a hose to a complex of filters
Water supply node
Use in the scheme of a ball valve
Connecting the system to the water supply
Sewerage Connection Node
Installing a hose clamp
Step # 1 - study the filter
Before installation, it will not hurt to understand exactly how the fluid moves through the system. First, you need to make an insert into the water pipe to connect a hose to it that connects the water supply to the preliminary filters. Water passes through these filters, leaving particles of mechanical and chemical contaminants in their cartridges.
Then the prepared stream moves to the membrane and passes through its body. Two hoses extend from the diaphragm block. One of them is intended for concentrate and is connected to the sewer system.
With this hose, contaminants are disposed of. Permeate along the second hose, i.e. purified water enters the expansion tank. Here, water accumulates and is stored. It is almost impossible to do without such a capacity and ensure the normal functioning of the reverse osmosis system.
The fact is that the average productivity of a household membrane is usually about seven liters per hour. For domestic needs, such a slow flow at some point may not be enough.
The storage tank completely solves the problem. A sufficient amount of clean water is stored in it, which is constantly replenished as the liquid decreases. After the expansion tank, water can be supplied directly to the drinking water tap, but this is rarely done.

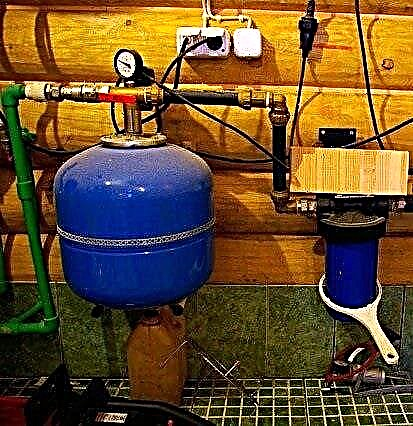
Elements of the reverse osmosis system are quite compact in size, so they are not difficult to install in the space under the kitchen sink
If it is already decided to provide the house with high-quality water, it makes sense to pay extra for a high-quality post-filter, mineralizer or other similar device. Some people prefer to use several such blocks at once.
In this case, you need to select a crane with two valves. It is connected in such a way that only purified water flows through one valve, and enriched with minerals through another.
This is done so as not to use mineralized or structured water for cooking, because when boiled, this effect will simply disappear. Thus, the use of a crane with two valves allows you to increase the life of the mineralizer.
Step # 2 - choose the optimal installation location
Immediately you should choose the installation site of the reverse osmosis system and a drinking tap for water. Most often, this element is placed on a kitchen sink, for which a small hole is drilled in its body.
If desired, the location of the drinking water tap can be changed. But then you should definitely provide access to the sewage system so that water that accidentally spills over the edge of the tank does not spill throughout the kitchen.
In the spacious kitchen, you can put another small sink specifically for drinking water, but such a need is extremely rare. It is most convenient to install system elements close to the drinking tap and from each other. The shorter the hoses through which water moves, the more efficient the system is.
Traditionally, the system is installed in the same place as household filters - under the sink. The dimensions of the storage tank and the filter unit allow this to be done. Before starting work, check the system for compliance with incoming parameters.

The presence of all elements of the system is checked without opening the packages. Otherwise, the manufacturer will not accept claims of incompleteness.
It is necessary to verify:
- pressure in the membrane tank;
- temperature of incoming water;
- pressure at the entrance to the reverse osmosis system.
The indicators can be different, they are indicated by each manufacturer in the operating instructions separately for each model. Install the system away from heating appliances, in a place that is closed from sunlight.
First, the current of cold water is shut off, and if the mixer has only one handle, then the hot one is also turned off. Then open the tap to relieve pressure, and then close it.
Before mounting the connecting tubes, the membrane, as well as the reverse osmosis cartridges, you must sanitize your hands.
Step # 3 - install a drinking tap
If the sink already has an additional hole, for example, for a dispenser of liquid detergent, it can be used under a reverse tap osmosis drinking tap. If there is no such hole, you will have to do it yourself.
Particular care should be taken when working on an enameled surface so as not to damage the protective layer.
Installation is carried out on the edge of the sink or on the countertop near the sink. A flat horizontal surface with a diameter of about 4 cm is suitable for installation. Before installation, you need to make sure that the space under the sink allows you to fix the faucet and bring the pipes in without bending.

To carry out the work gently, on all surfaces on which the shavings will fall during drilling, they cover the fabric or newspaper. After installation, the chips can be quickly collected
Some sinks have holes for installing an extra tap.
If it is not, then perform the following actions:
- Hole preparation. A drill with a diameter of 6 mm drills a hole at a low speed in the sink or in the countertop. In order not to damage the surface and prevent chips, you can stick a patch on it. For ceramic or stone surfaces, a carbide drill is used.
- Hole expansion. Next, take a drill with a diameter of 11-12.5 mm, increase the hole and remove the patch. If the edges are torn, they are cleaned with a file or a file.
- Surface cleaning. The chips are removed, the metal ones are carefully removed until it leaves rusty spots on the surface of the sink.
- Sealing. Before installing the tap in the hole on its lower part, put on a decorative pad and a rubber washer to seal the joints.
- Assembly. The lower base of the crane is inserted into the hole, a rubber, plastic, and then a metal washer is put on it from below. The resulting structure is tightened with a nut using a wrench or pipe wrench at 14.
A fitting is screwed onto the lower base, inside of which there should be a rubber gasket.

The connection of a standard crane is carried out according to the manufacturer's scheme. In this way, a double faucet is used, which is used for a cleaning system with a mineralizer.
Step # 4 - connect to the water supply
First, of course, it is necessary to shut off the cold water supply.Connection to the water supply is carried out using an adapter adapter. The most convenient place for its installation is the connection of a water pipe and a flexible eyeliner for a kitchen faucet.
Under this section, substitute a basin for draining the remaining water and carry out the installation:
- Disconnect the flexible connection of the mixer from the pipe with water, check the presence of a rubber seal in the adapter and screw the connection on it from both sides, tightening with a wrench.
- Unscrew the ball valve nut from the adapter to put it on the plastic tube.
- The tube is pulled onto a ball valve. Tighten the nut by hand, without putting much effort.
To improve the tightness on the external thread of the adapter and the water pipe, teflon tape is wound.

When connecting a reverse osmosis system to the water supply, a special tee is used. All threaded connections are sealed with linen thread or FUM tape
Step # 5 - crash into the sewer system
To drain contaminated water that remains after passing through the reverse osmosis membrane, a connection to the sewage system is carried out using a drainage clamp.
The insertion point should be at a level above the water seal, i.e. siphon. On a vertical or horizontal section of the drain pipe, above the siphon, a hole is made with a drill with a diameter of 7-8 mm.

Do not install the drain clamp in rounded, uneven areas. It will be impossible to achieve tightness of joints in such places
Before installing the clamp, a rubber gasket is glued to its bracket with a hole. Then fix the clamp, tighten the screws evenly and make sure that the brackets from opposite sides sit parallel and are tightly pressed, and the holes in the drain pipe and clamp coincide.
A black tube greased with silicone grease and a pre-dressed nut, which is tightly, but not tightened, is inserted into the fitting of the drainage clamp.

The clamp is supplied with the filter and is suitable for most plastic pipes (diameter 32-50 mm), which are used for sewage
Step # 6 - put the valve on the drive
The drive serves to create water reserves and maintain a stable pressure. Since reverse osmosis cleaning is slow, the reserve tank helps to quickly get the required amount of water that has been cleaned in advance.
Typically, the drive is mounted vertically on a special stand. But if such a need arises, it can be placed horizontally or mounted on brackets.
If there is not enough space under the sink, the storage tank is placed somewhere nearby, for example, in the adjacent kitchen cabinet. Hoses will have to make small holes in the walls of the kitchen furniture.

The storage tank of the reverse osmosis system is most often installed vertically on a special stand. During installation, check the working air pressure in the tank and adjust it in accordance with the normative indicators
The tank itself must be prepared before installation - a plastic valve must be attached to the threaded connection. FUM tape is screwed onto the thread of the storage tank in two or three layers.
Then, without using tools, a crane is screwed on it until it stops. A plastic tube is inserted into the tap fitting. Its other end is connected to a carbon post-filter (the last stage of cleaning).

In a new tank not filled with water, the internal pressure is set at 0.34-0.48 atm. Therefore, you can not open the valve in the lower part so as not to let out the gas that creates it
Another important point is the pressure in the tank. Pressure is measured by a manometer and, if necessary, air is pumped into the tank.
Step # 7 - mount the filter unit
When choosing a place under the sink for a filtration unit, it is taken into account that the tubes that are supplied in the set usually have a length of 1.5 m, and they should be located freely, without tension and bends.
If necessary, the filters can be hung on the inner wall of the cabinet. It is also necessary to provide free access to the ball valve. The pre-filter flasks are fixed on a special bar that can be hung on the wall of the kitchen cabinet under the sink.
The place should be easily accessible so that it is convenient to replace used cartridges. To open the flasks, use a special key.
The first step is to install prefilter cartridges according to the instructions. Their location must not be confused, otherwise the device may malfunction.

Flasks with pre-filters are fixed on a special stand, which is hung on the wall. It is important to ensure easy access to these items in order to replace the cartridges.
To install the cartridge remove the protective film and place it in a housing that is installed back into place. Make sure that the sealing gum is skewed. After the filters are installed, on top of the special holders install the housing in which the reverse osmosis membrane is located.
A post-filter and a mineralizer or other modules are fixed above the membrane. After that, all elements of the system are connected by hoses, which are fixed with special clamps.

Hose openings in the reverse osmosis system are protected by transport plugs. These plugs must only be removed before connecting the hoses.
The connection order is usually fully described in the instructions. It is necessary to connect the water supply to the prefilters. Withdraw water from the filters to the membrane, and then from the membrane, conduct two hoses: to the sewer and to the storage tank. From the tap of the drive, a hose is removed to the post-filter, and then to the drinking water tap. Another hose is passed through the mineralizer.
Installing the membrane in the housing is as follows:
- disconnect the tube from the body fitting;
- using a key, unscrew the cover;
- insert the membrane into the housing and push it all the way;
- close the lid and insert the tube into place.
The tubes for connecting the filter elements are lubricated with silicone grease or petroleum jelly and connected in the following order:
- The water supply pipe is connected to the inlet of the first filter.
- The storage tank is connected to the inlet of the filter, performing the fifth stage of cleaning.
- The output of the fifth stage is connected to a tap of purified water.
- The second end of the pipe, which is connected to the sewer pipe, is connected to the outlet of the flow restrictor.
After checking the correct connection of all the tubes, you can consider the equipment ready for use. It remains only to fill it with water and flush.

To make a connection, the tubes cut off a segment of the desired length at a right angle, insert fully into the convector. Pressing with effort, they recess another 5-6 mm, generally deepening it by about 17 mm. You can check the grip by pulling the tubes slightly in different directions. To disassemble the connections, press the collet with your finger to the stop and pull the tube towards you
Step # 8 - fill and rinse the filter
Before the first filling of the filter, the valve on the tank and the stop valves of the pipeline are closed.
The following acts as follows:
- Open the tap for drinking water;
- Unscrew the common valve of the water treatment system;
- Open the ball valve that supplies water to the reverse osmosis filter.
The first 5-10 minutes you should not expect water - air will come out of the system. When the water starts to flow out, its pressure will be small, because at that moment the tank valve is shut off. You do not need to open it yet, you must wait for the water to rinse the filter device for two hours.
After draining a certain amount of water, the tap is closed and the device is left alone for another 10 minutes, at this time the installation is checked for leaks. If a leak is detected, tighten leaking connections. After making sure that the system is working properly, open the tank valve.

After installing the filtration device, it is necessary to check it for possible leaks and malfunctions within a week
Filling the tank can last for several hours, the speed depends on the pressure of the water. Then the system is washed again - to drink water, after the first filling of the tank, it is categorically not recommended.
Only after the second filling of the container can you begin to use purified water.

The first purified water may have a milky color - this is normal - air is displaced and its bubbles create such an effect
The primary water accumulated in the tank should be completely drained into the sewer. After that, the water is again opened for purification. When the tank is full, you can start using the system in normal mode.
Operation tips
If, after starting the system, drinking water has a milky tint and contains small air bubbles, do not worry. This is the effect of air dissolved in water; it is not dangerous. This effect will disappear after a few days or weeks.
Too fast contamination of the pre-filters and the presence of mucus on the cartridges can be a symptom of low pressure in the water supply network. The problem is usually solved with a pump.
Sometimes flushing the carbon filter can cause contamination of the third filter immediately after installation. To prevent this from happening, it is better to install the third filter after the carbon cartridge has been washed. But do not try to rinse the carbon filter under running water, it can be ruined.
Do not neglect flushing the carbon cartridge, as this can lead to rapid clogging of the membrane. Too high a pressure in the water supply system, too rare replacement of pre-filters or the use of low-quality cartridges, or clogged sewage can produce the same effect.
If limescale forms in the kettle when boiling water, check the connection procedure. Possibly, a hose is connected to the drinking tap, through which it enters the concentrates, and the treated water goes into the sewer.
If the purified water has acquired an unusual odor and taste, it is necessary to check the pre-filters as soon as possible. Perhaps their resource has been exhausted, a replacement is needed. Also, this phenomenon may indicate the presence of bacterial contamination.

The reverse osmosis membrane cartridge is located in a plastic case. It must be replaced every 3-5 years, depending on the salt content in the treated water.
Pre-filter cartridges should be replaced every six months or more often. A new membrane usually needs to be put every three to five years. The condition of the treated water should be checked annually. If the salt content exceeds 20 mg / l, the membrane must be replaced.
Replacing filter elements
In order to replace the fillers of the cartridges with their own hands, they shut off the water supply and device shutoff valves. Then open the tap of purified water and drain the remaining liquid.
Next, disconnect the plastic tubes and remove the equipment from the cabinet. You can remember the location of the tubes by marking them or using the camera (if the tubes are colored).
Unscrew the lids of the housings and remove the exhausted cartridges, the filtration membrane. Plastic flasks and lids are washed with dishwashing detergent.
When installing new filter elements, carefully observe the installation procedure, check for the presence of a rubber gasket on the cover.
The rubber sealing rings are wiped dry before installation. Assemble and flush the system as well as when installing a new device.
Replaceable filter elements are carried out with such a frequency:
- reverse osmosis membrane - every 24-30 months;
- carbon post filter - once every 12 months;
- prefilters - once every 6 months.
The frequency of replacement largely depends on the quality of the water. New replaceable elements are replaced with the same ones, referring to their marking.

Exhausted cartridges can do even more harm to your health than untreated water.
Installation of accessories
The operation of even such serious equipment as a reverse osmosis filter can be made more efficient by installing additional elements.
Such as for example:
- Pressure regulator. The equipment is designed to protect water supply elements from pressure drops, exceeding permissible values at the inlet to the filtration system and compensate for water shocks.
- Leakage protection system. It is installed in front of the filter and blocks the water in case of leaks and water getting on it. It minimizes risks and limits the amount of damage caused, but does not completely exclude the possibility of leaks.
- Nitrate prefilter. It is used for effective removal of nitrates, the installation site is agreed with specialists.
- Ice machine. It is connected through a tee to the gap of the connecting tube leading to the drinking tap.
Before installing the filter, measure the pressure in the line with a manometer. At values greater than 6.6 atm., Install a gearbox, at less than 2.2 atm., Install a pump that will create a larger head.
For devices that are most commonly used to improve reverse osmosis functionality, the following is a more detailed description.
Element # 1 - booster pump
The membrane filter, which is the basis of the reverse osmosis system, can fully function only with a certain water pressure in a private house or apartment.
If the maximum pressure does not exceed 2.8 atm., Then for the normal operation of the filter it is necessary to install an additional pump.
If you have to buy equipment, then it is better to do this from one manufacturer and be guided by the connection schemes developed by him.

An example of one of the possible schemes. The pump can be placed in the gap of the driving tube before the first prefilter, as well as after the second or third
Install the pump only in tandem with the pressure control sensor, which is responsible for turning it on when the pressure drops and turning it off when it jumps to the maximum.
The sensor is mounted in front of the storage tank, in the gap of the tube. If the quality of tap water is poor, a coarse main filter is installed in front of the pump.

Fix the pressure increase pump on a horizontal or vertical surface using a special bracket and screws
If there is a danger of increasing the water pressure in the system up to 3-4 atm., Then to prevent leaks, a special pressure-reducing valve must be installed in front of the pump.
Element # 2 - UV Lamp
Sometimes in the reverse osmosis filter, favorable conditions are formed for the rapid development of microorganisms as a result of an increase in water temperature or a downtime of the system for a long time.
This leads to fouling of the prefilters with microorganisms, a decrease in pressure and a decrease in the productivity of the equipment. And then ultraviolet filters are used to disinfect water.
The device consists of such parts: a stainless steel case with a UV lamp inside and a power supply unit that converts the mains voltage to the values necessary for the lamp to work and protects it from power surges.
Water passing inside the casing is translucent with ultraviolet rays and disinfected.

UV lamp can be installed after the filter or in front of it. When mounting the lamp in front of the filtration unit, it is often used complete with a prefilter
The location of the ultraviolet lamp may depend on the goals you need to achieve:
- at the inlet to the filter - to eliminate strong biological pollution of tap water;
- between tap and tank - to protect against the ingress of microorganisms into the tank from a drinking tap.
There are two clips on the lamp for ease of installation, which help to fix it on the filtration unit or on any other surface.
Element # 3 - mineralizer for water
Water passing through the membrane filter is 90–99% purified and gets rid of any impurities, including mineral elements that are useful and necessary for the body. Such water tastes sour.
Mineralizers make up for the lack of essential minerals, adjust the level of PH. Mineralizer cartridges of different brands can differ in their composition and resource and enrich the water with calcium, zinc, magnesium, and other elements.

The installation of the mineralizer is carried out after the membrane filter and is connected mainly to a double tap. Thus, the user has the opportunity to choose between simple purified and saline water
In some models of reverse osmosis filters, the mineralizer also plays the role of a filter and is installed as the last stage of purification.
An understandable video on how to set up reverse osmosis yourself can be viewed here:
This video contains useful information on replacing pre-filters:
To carry out the installation of a reverse osmosis filter with your own hands, it is necessary not only to prepare the instrument, but also to conduct water analysis, study the parameters of the water supply system and filtration device.
You need to carefully study the instructions and accurately follow the manufacturer's recommendations. Properly selected equipment is 50% success. And then the installation itself will not be difficult. And timely maintenance of the system and replacement of waste elements will provide the house with high-quality drinking water.
Share with your readers your experience in improving the quality of drinking water. Please leave comments on the article and ask questions of interest to you on the topic. The feedback form is located below.